Ultrasonography: equipment and preparation
02.04.2020
The quality of diagnostic interpretation cannot exceed the quality of image acquired. The image quality is dependent upon the user, and the first important steps are to choose appropriate equipment, know how to optimise image quality using the machine setting options, and adequately prepare the patient. This article will take you through the basic principles of these essential first steps.
Equipment
An ultrasound machine with a linear transducer is ideal. A linear tendon transducer has higher frequency capability than a linear rectal transducer and will provide images of a higher resolution. A micro-convex transducer can be useful, if available. A standoff pad may be used for imaging the superficial structures such as the collateral and patellar ligaments.
- Image/probe orientation – ultrasound images should always be acquired and viewed in the same orientation. We recommend that proximal, dorsal/cranial or medial should be on the left of the image, however there is some variability in chosen image orientation among clinicians and consistency within the user is the most important thing. A symbol or marker on the screen will correspond to a marker or notch on the probe head.
- Holding the transducer – hold the probe with one hand, near the head, to optimise fine control. Remember to keep your arm and shoulder relaxed. It can be helpful to use your other hand to help stabilise the probe.
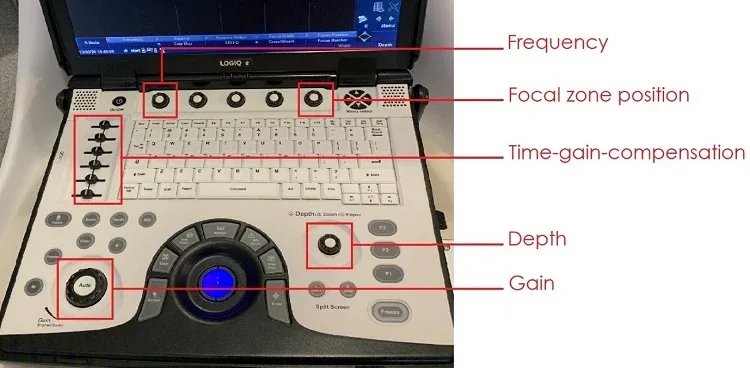
The following machine settings should be optimised for each structure evaluated. Whilst every machine is different, these functions are usually clearly labelled.
- Depth setting – Image depth should be adjusted so that the structure(s) or area being imaged fills approximately 75% of the screen.
- Frequency – Frequency influences image resolution and depth of penetration. Higher frequencies offer improved resolution but shallower depth of penetration, whereas lower frequencies will offer deeper penetration at the expense of image resolution. Rule of thumb: choose the highest frequency available (to optimise image quality) that allows the depth of penetration required.
- Focal point – Image resolution will be optimised at the level of the position of the focal point(s). Place the focal point at, or just below, the level of the structure or region of most interest. Note: multiple focal points can be used to increase the area optimised for resolution but this will reduce the frame rate and can cause a slow/sluggish scanning experience.
- Overall gain – This is the manual alteration of signal amplification. This will be user- and environment-dependent. However, using a gain setting that is too low may lead to loss of important detail, and using a gain setting that is too high will amplify noise in addition to echoes from structures, causing high-gain artefact.
- Time-gain-compensation (TGC) – by altering the TGC sliders, the gain at different depths on the image can be altered. Optimise the TGC settings so that the image gain is uniform throughout the image from the near field to the far field.
Environment
- Mains power supply if the ultrasound machine is not battery-operated.
- Dark or shaded area to allow easy visualisation of the ultrasound image on the screen. If performed in a bright environment, the overall gain setting will have to be increased, thereby amplifying ‘noise’ and reducing overall image quality.
- Choose a calm environment, whether that is an area which is familiar to the horse or a quiet examination room. Minimise audible and visual stimuli (cotton wool ear plugs and blinkers may be useful).
- Position the horse and machine ergonomically. The user may be standing or seated next to the stifle to be imaged. Position the machine so that the monitor is easily visible and there are no reflections on the screen. The machine controls should be within easy reach of the user because the settings will have to be altered to optimise the image for different structures.
Patient preparation
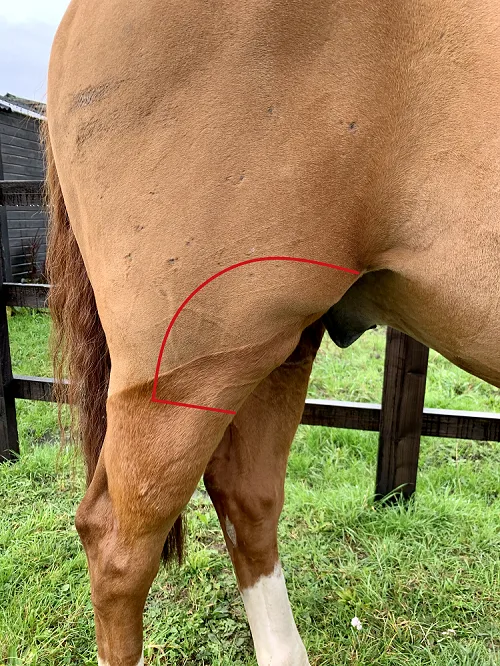
The hair coat should be clipped from distal to the tibial tuberosity, caudal to the medial and lateral collateral ligaments, and up to the skin fold of the flank
- Restraint – the horse should be held by a competent handler. Sedation will often assist the safe and efficient acquisition of high-quality images.
- Skin preparation – for the best image quality, the hair coat should be clipped, the skin cleaned and degreased with dilute chlorhexidine or isopropyl alcohol, and acoustic contact gel applied liberally. In horses with a fine hair coat, adequate image quality is often achievable without clipping, by applying copious isopropyl alcohol +/- acoustic contact gel.
Tip: The best image quality will be acquired over 5 minutes after the initial application of gel. Allow adequate time by preparing the patient first, and then setting up your equipment as the gel soaks in.